All your broker accounts. One screen.
Monitor every account in real time and manage activity across all of them. Built for Indian markets and shaped by 8 years of trader feedback.
Free for 1 month. Then ₹295 to ₹495 per account, all taxes and a free static IP included — saving up to ₹500 per broker trading account per month.
- ✓ Monitor all your broker accounts in one place
- ✓ Replicate your own orders across your accounts, under your control
- ✓ Place bulk orders across many broker accounts at once
- ✓ Connect your own TradingView alerts to your accounts
- ✓ Build your own broker-independent system using our APIs (for programmers)
- 40+ brokers
- 8+ years in operation
- 99.98% uptime
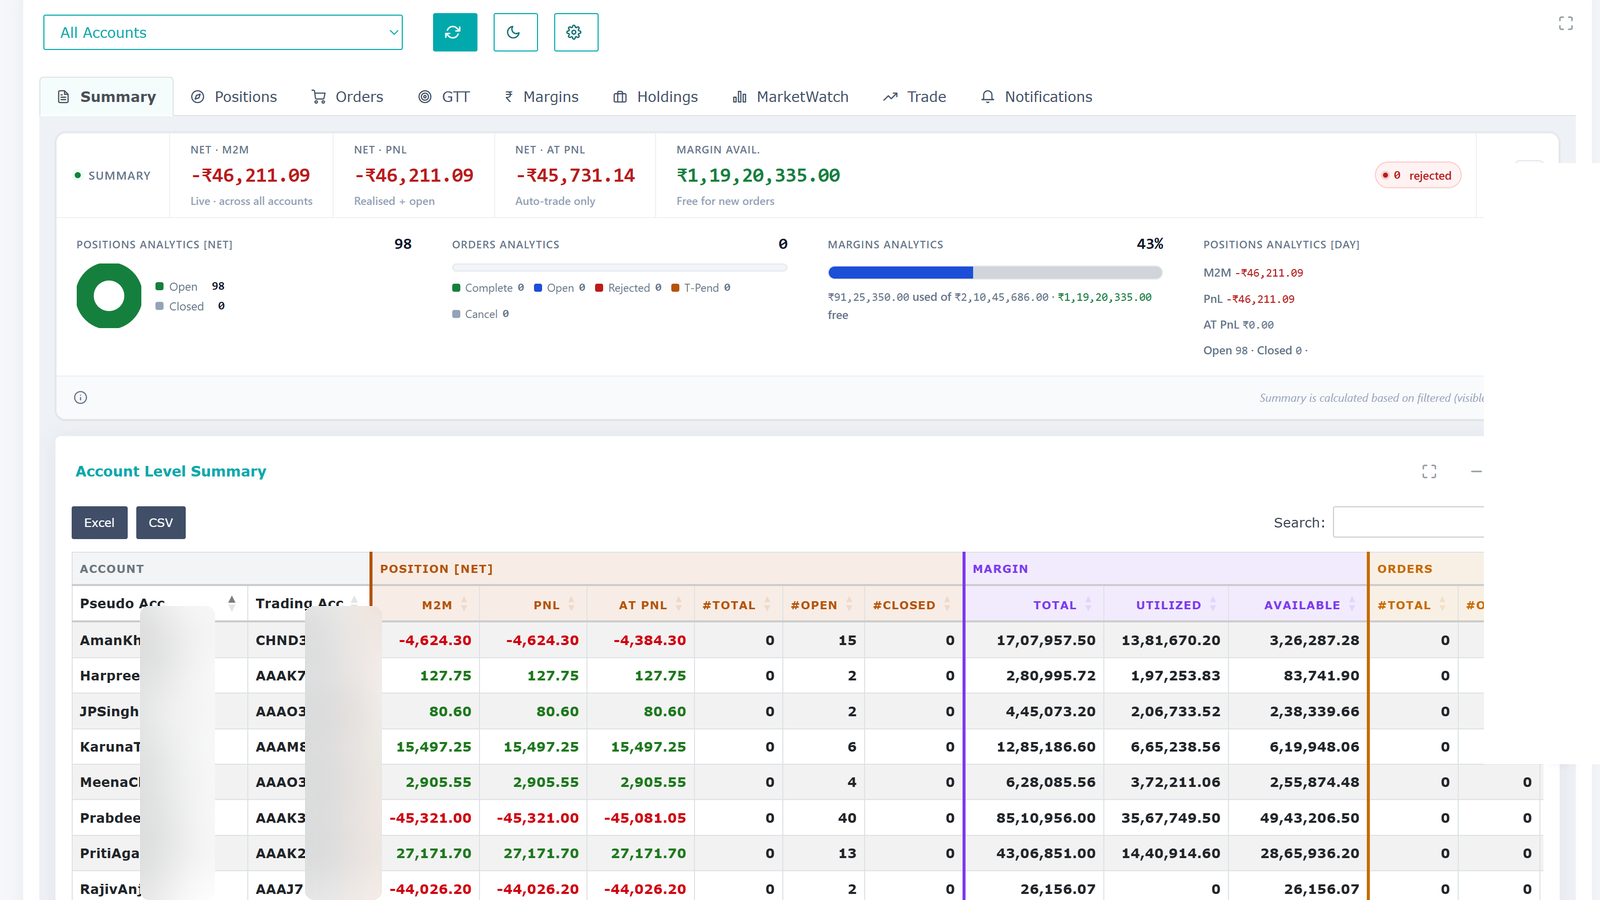
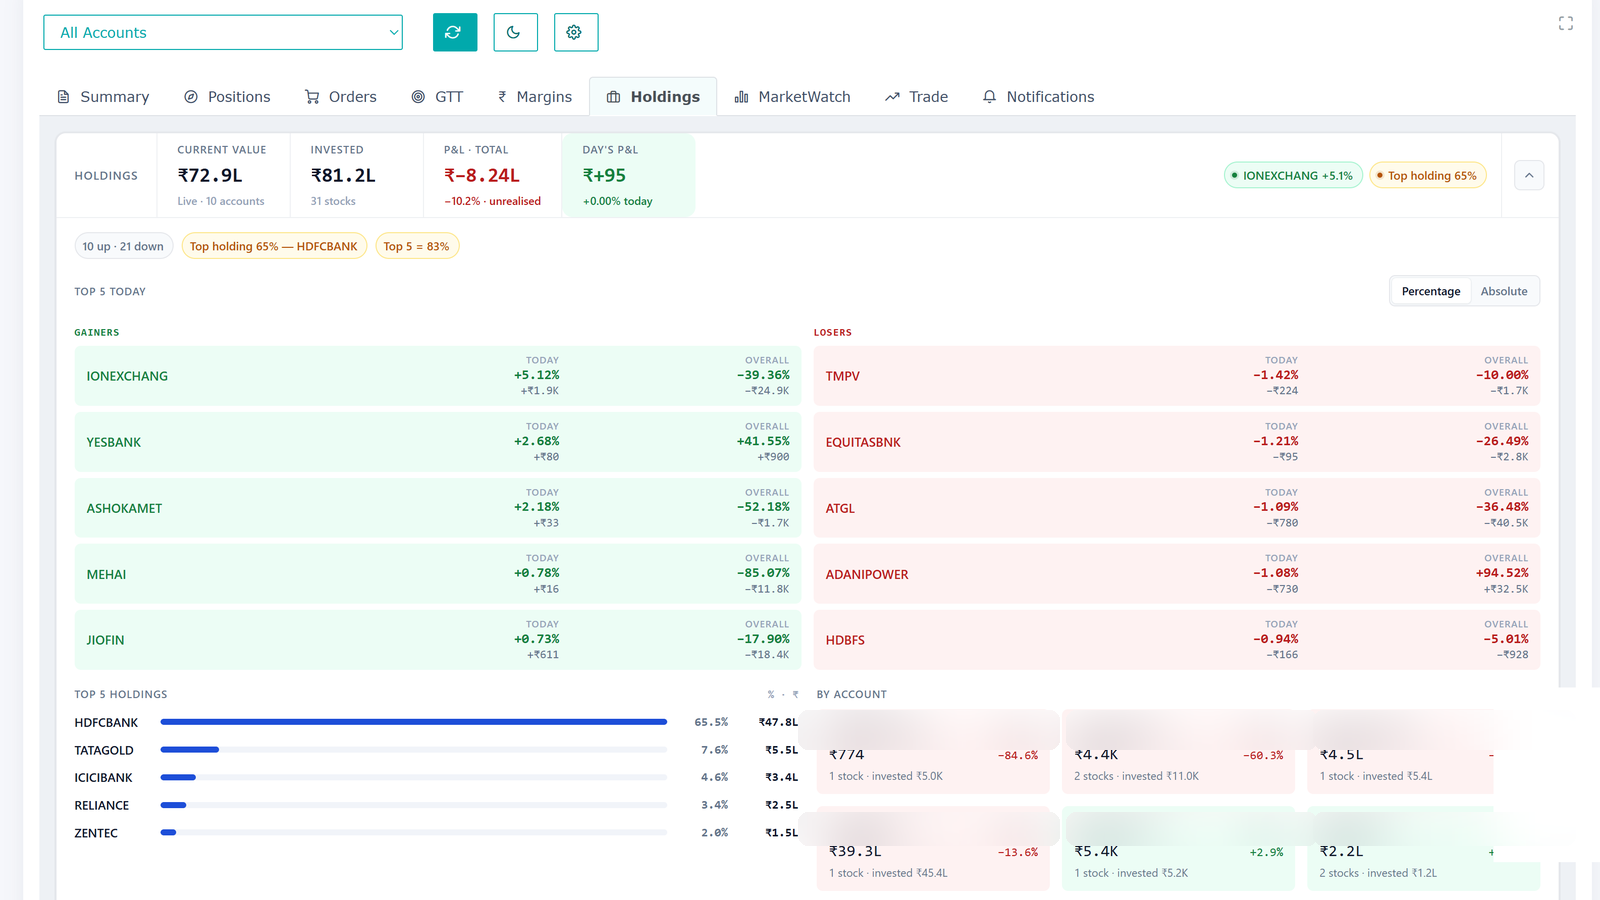
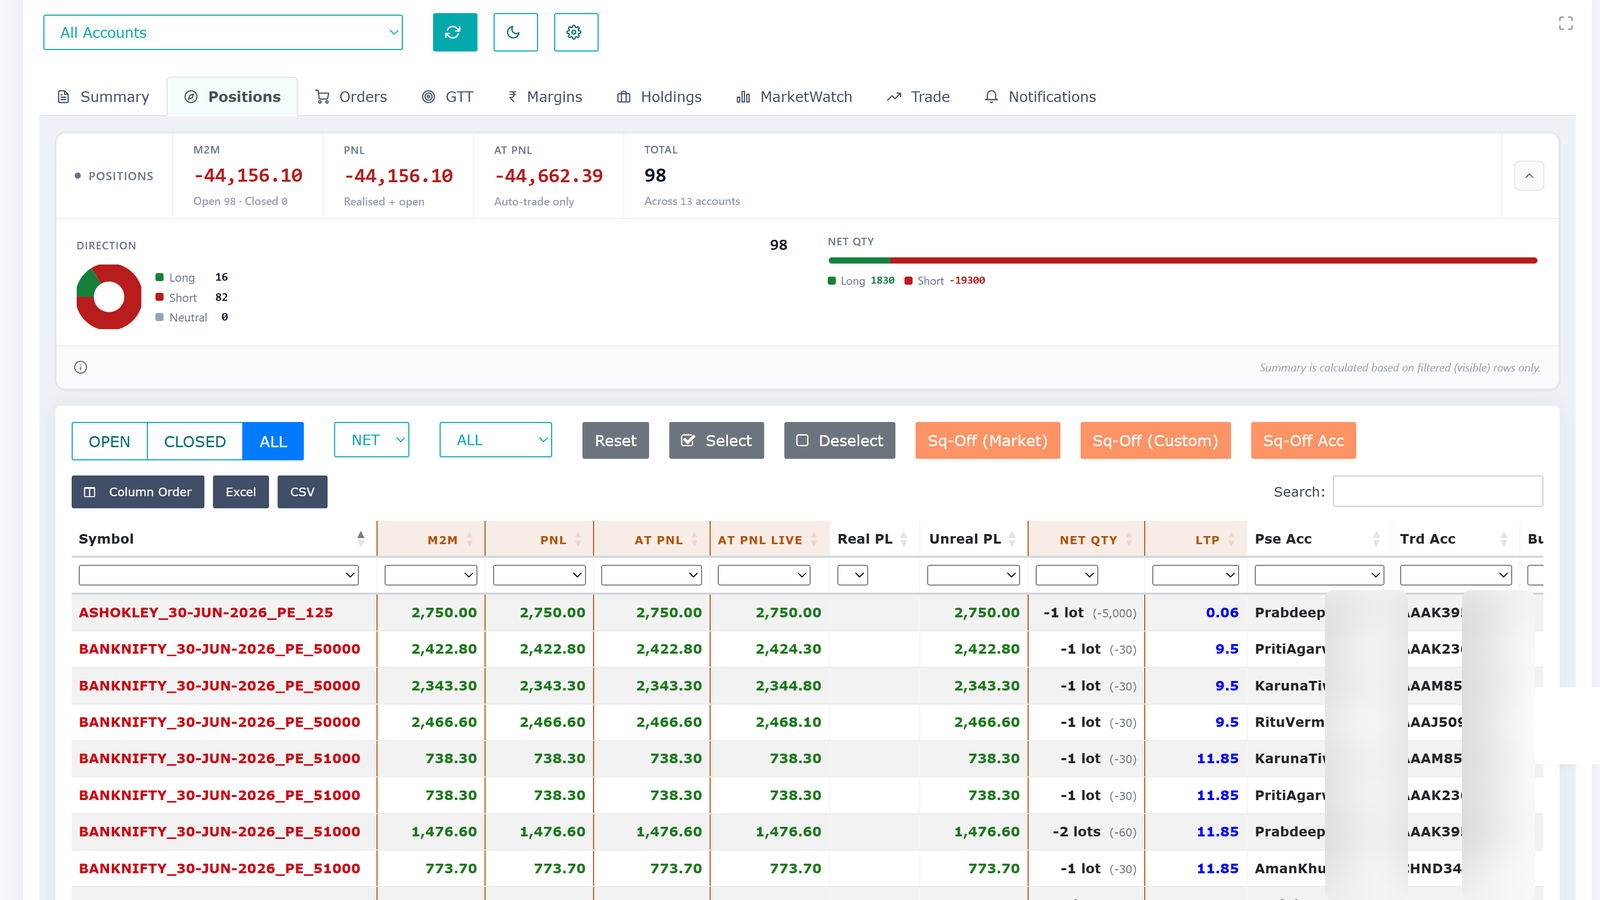
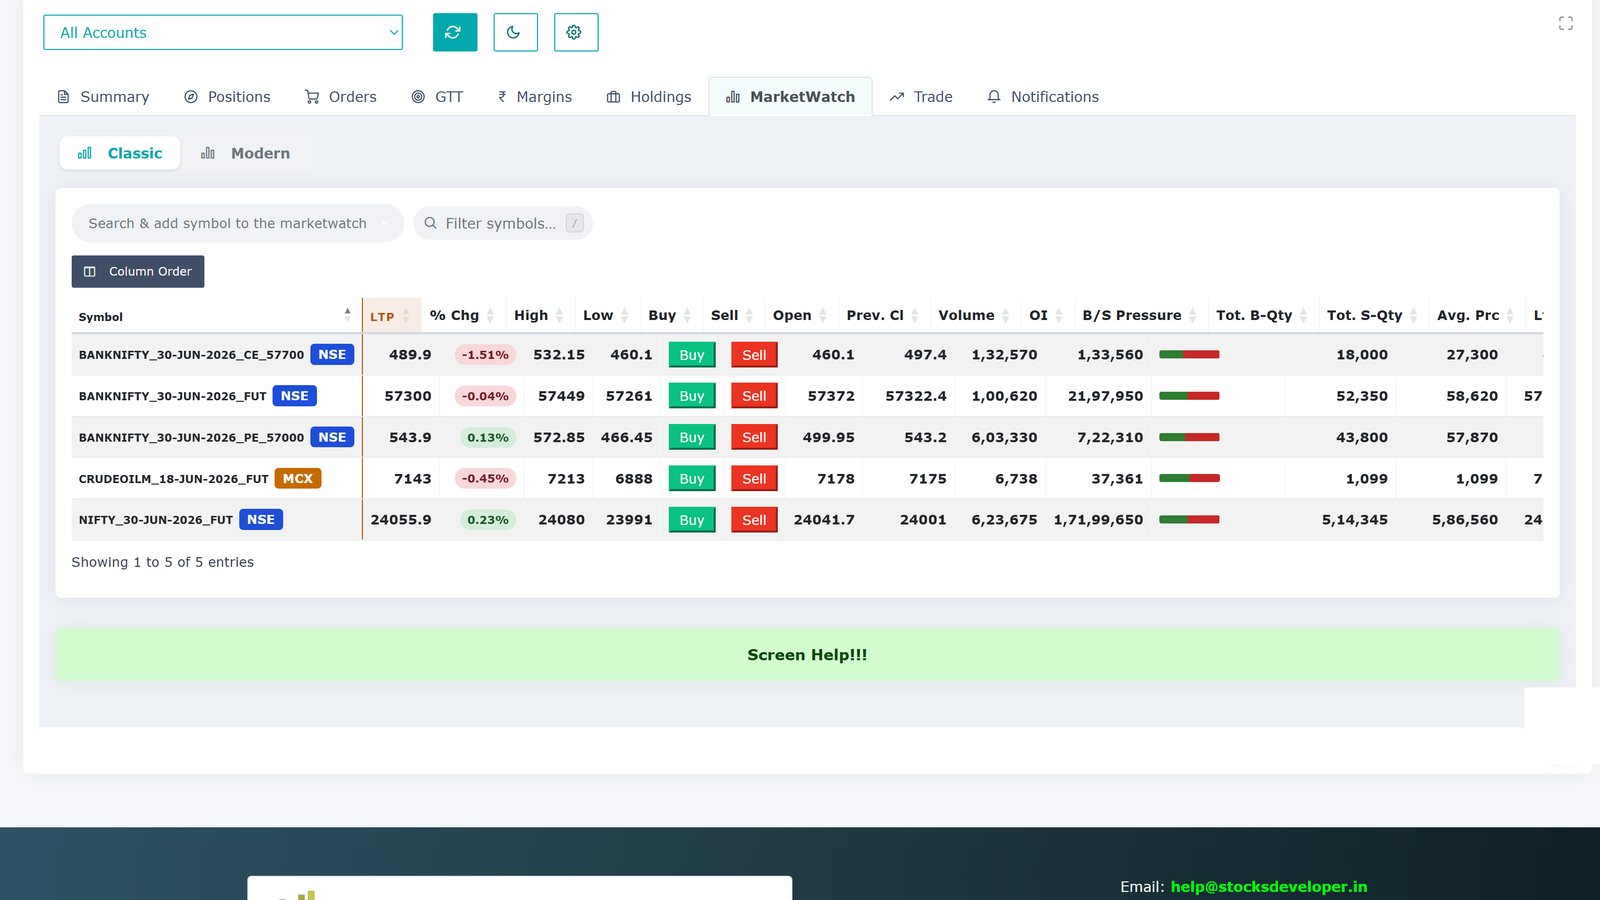
See it in action
Real screens from the platform — your accounts, live, on one screen.
Supported brokers
Connect 40+ Indian brokers. Search for yours below.
It seems we do not support the broker you are looking for, you can request our team to add it.
Plus any broker that supports the Symphony XTS API.
Monitoring many broker accounts is slow and painful
If you trade or manage more than one account, your day starts with a stack of logins. You keep switching between browser windows all day. There is no single place to see how you are really doing. By the time you add it all up by hand, the numbers have already changed.
One real-time screen
Stocks Developer brings every account together. Connect all your broker accounts and see consolidated, real-time P&L, holdings and positions across all of them at once. Live data. No switching tabs and no spreadsheets. When you want to act, you can place and manage orders across one account or many.
By hand vs. one screen
The same daily work, with and without Stocks Developer.
| What you need to do | By hand, account by account | With Stocks Developer |
|---|---|---|
| See total P&L across all accounts | Log in to each account and add it up yourself | ✓Live on one screen, always up to date |
| Check holdings and positions | Switch between broker windows all day | ✓Every account together in one view |
| Place the same order in many accounts | Repeat it by hand, one account at a time | ✓Place bulk orders across accounts at once |
| Replicate a trade across your accounts | Hard to do by hand in time | ✓Replicated across your accounts once you set it up |
| Set GTT orders | Set them up broker by broker | ✓Set across accounts from one place |
| Act on TradingView alerts | Watch alerts and place orders by hand | ✓Your own alerts place orders in your accounts |
| Build your own system | Write separate code for each broker | ✓One broker-independent API works across all |
What makes us different
8+ years in operation · 99.98% uptime · 40+ brokers
Free static IP included
A dedicated static IP comes free with every account. Many other tools charge extra for it or make you set one up yourself — so you save up to ₹500 per broker trading account per month.
Nothing to install. Use it anywhere.
No software to install, no PC setup, no server or VM to keep running. It works on your computer or phone, from anywhere. Your trading does not depend on your machine staying on.
One of the lowest prices in the category
₹295 to ₹495 per account per month, with all taxes and the static IP included. No setup fee, no hidden charges, and a free 1-month trial.
40+ Indian brokers, one platform
Connect over 40 Indian brokers and work across all of them with one broker-independent system. One of the widest broker coverages available.
Two ways to copy trade
PMS copy from our terminal and master-child copy in the background, across brokers, with per-account sizing — all set up and controlled by you. Many tools offer only one.
Your security, your control
Credentials encrypted and stored in India, broker OAuth login and two-factor authentication, portfolio data never stored, plus a Kill Switch and a full activity log.
See how we keep you secure →What you can do
One consolidated view
See live P&L, holdings, positions and orders from every account and every broker on a single screen.
Order replication, two ways
PMS places an order from our terminal into the accounts or groups you choose. Master-child replicates orders from one of your accounts to many in the background. Per-account sizing and segment control included, all set up by you.
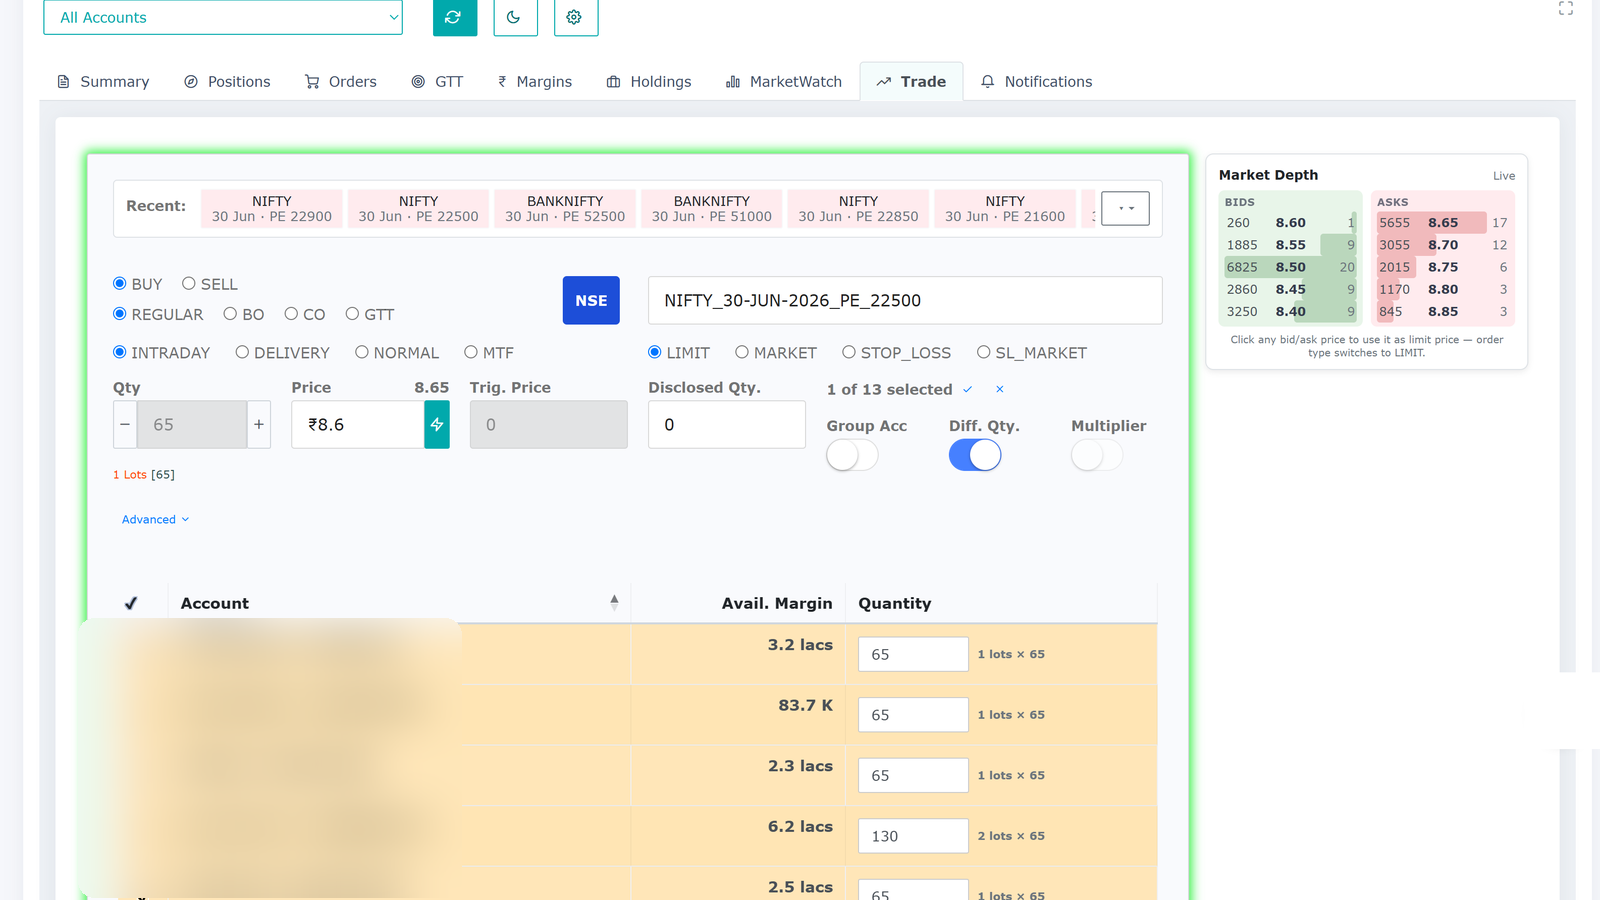
Orders and GTT
Place, modify and square-off across many accounts at once, and set GTT orders that go to the exchange when your trigger price is hit.
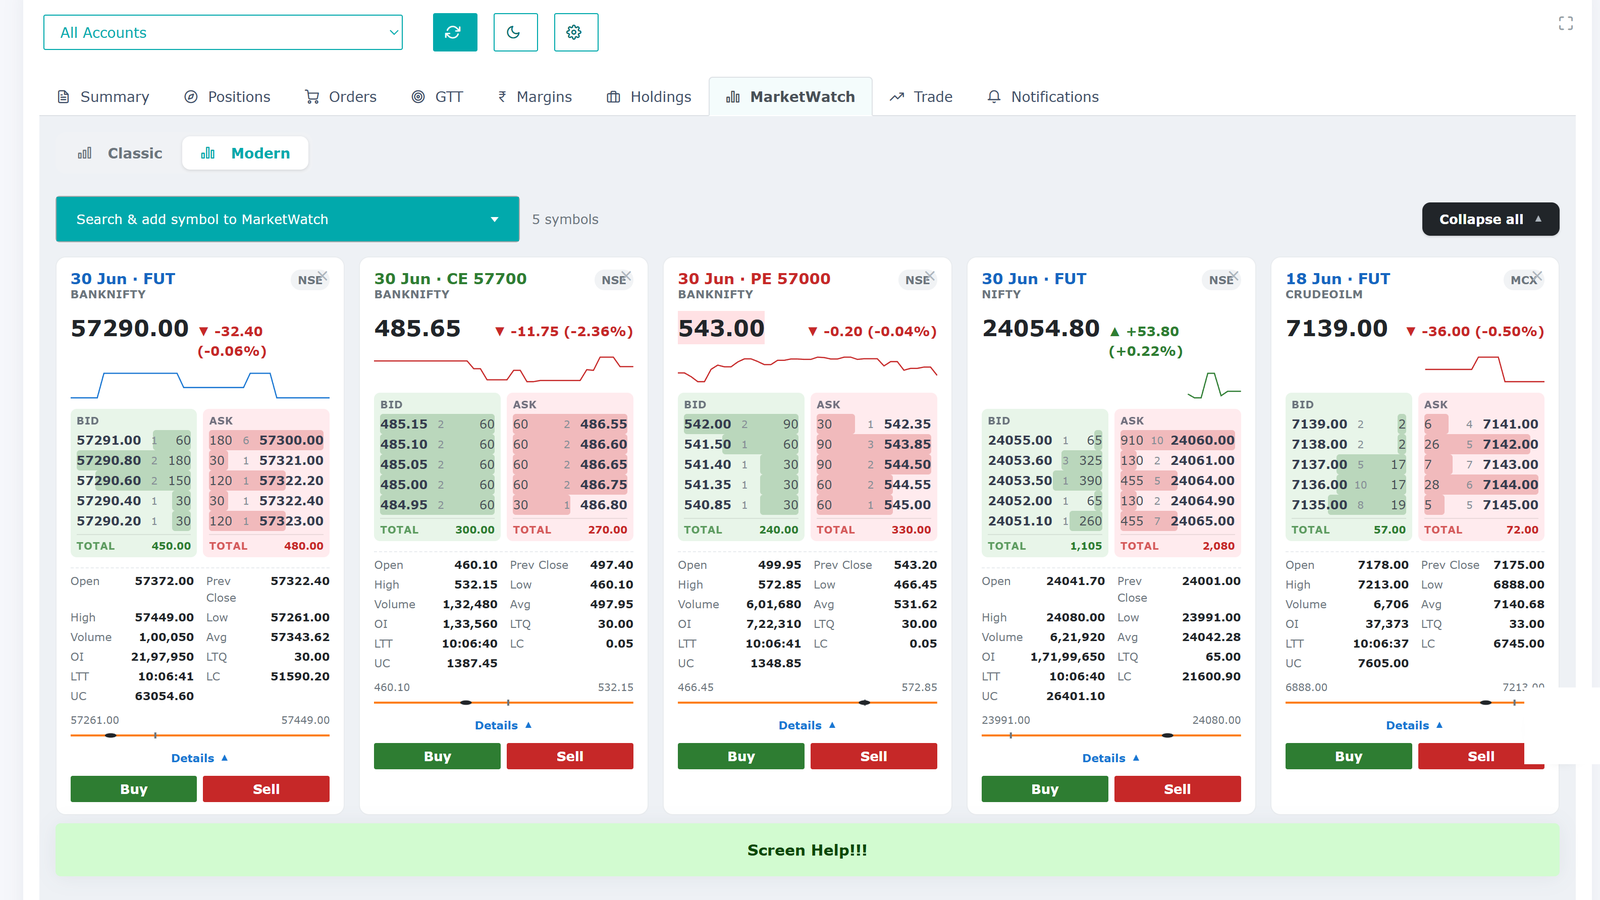
MarketWatch
Live watchlists with prices, depth and mini charts, in classic and card views.
TradingView connection
Connect your own TradingView alerts so they place orders in your accounts, on one account or many. You set up the rule.
APIs for developers
Build once on our broker-independent APIs and your system works across every supported broker.
Feedback-driven
Built with traders, not just for them
Almost everything we ship starts as user feedback. Trigger orders, the new Portfolio dashboard, dark mode and more — all shaped by traders like you. Tell us what you need, and if it helps traders and fits the product, we build it fast.
How it works
Connect your accounts
Add your broker accounts. Use OAuth login where your broker supports it.
See everything in real time
All your accounts appear on one screen with live, consolidated P&L, holdings and positions.
Act on your accounts
Place and manage orders, and filter and sort across accounts.
See your whole portfolio on one screen
Connect your accounts and watch everything live. The first month is free.
Who it is for
Multi-account traders
Trade through several brokers and want one place to watch and act.
Sub-brokers and Authorized Persons
Manage many client accounts and need a fast, consolidated view.
RIAs and portfolio managers
Track holdings and P&L across all client accounts in real time.
Family account managers
Trade for your family or HUF accounts and want them all on one screen.
Systematic and automated traders
Run a TradingView, Amibroker or Python strategy and want it executed across your accounts, hands-off.
Prop desks and trading firms
Oversee many dealer or prop accounts with a live view, bulk actions and a Kill Switch.
Programmers and developers
Want bulk orders or to build your own broker-independent system on our APIs.
Built for trust
You are connecting real broker accounts, so control stays with you.
What we store, and what we don't
Your API credentials are kept only in encrypted form, on servers in India. Your portfolio data is never stored — it flows from your broker to your browser and is cleared right after. We never share your data.
Runs on Google Cloud, in India
Our software runs on Google Cloud in its Mumbai, India region — one of the world's most trusted and secure cloud platforms. Being hosted in India means fast, low-latency performance for Indian markets, with strong security and high reliability.
OAuth and 2FA
Log in on your broker's own page where supported, and protect your account with two-factor authentication.
Kill Switch
Broker account owners get a Kill Switch to stop trading at any time.
You stay in control
You set up and control every activity, and you can stop it at any time. We make no trading decisions for you, and our staff cannot trade your account.
Full transparency
A searchable activity log shows every action the system took on your account, with the time and outcome. For each order, you also see a clear timing breakdown — how long our system took and how long your broker's servers took — so you always know where any delay came from. Check anything yourself, any time.
A technology company, not an advisor
Stocks Developer is a technology company. We build software tools that help you watch and work across your broker accounts. We do not give investment advice, tips, recommendations or trading strategies, and we make no trading decisions for you. All trading and investment decisions remain solely your responsibility. You set up and control every activity, and you stay in full control of your accounts.
Common questions
Why choose Stocks Developer?▾
A free static IP with every account (saving up to ₹500 per broker trading account per month), nothing to install and use from anywhere on web or mobile, one of the lowest prices in the category with all taxes included, 40+ Indian brokers on one platform, both PMS and master-child copy trading, and security you control. Every new account gets a free 1-month trial.
Which brokers do you support?▾
Over 40 Indian brokers, plus any broker that supports the Symphony XTS API. See the full list above.
Is my data safe?▾
Yes. Your Stocks Developer website login password is one-way hashed and can never be read back. Your API credentials are stored only in encrypted form. Your portfolio data is never stored in a database. It flows from your broker to your browser and is cleared from memory right after. We never share your data.
Where is your software hosted?▾
On Google Cloud, in its Mumbai, India region — one of the world's most trusted and secure cloud platforms. Being hosted in India gives fast, low-latency performance for Indian markets, with strong security and high reliability.
Do you give trading advice or tips?▾
No. Stocks Developer is a software tool only. We do not give advice, tips or recommendations of any kind.
Will you trade my account on your own?▾
No. We make no trading decisions for you. You set up and control every activity, and you can stop it at any time. Our staff cannot place trades.
Can I see whether a delay was caused by your system or by my broker?▾
Yes. For each order you get a clear timing breakdown showing how long our system took and how long your broker's servers took, so you can always tell where any delay came from.
Can I replicate trades across my accounts?▾
Yes, in two ways. PMS places an order from our terminal into the accounts or groups you choose. Master-child replicates orders from one of your accounts to many in the background. You can scale each account and choose which segments are replicated. Both are included in your plan, and you set them up yourself.
What is the difference between PMS copy and master-child copy?▾
With PMS copy you place the order in our terminal and pick the accounts or groups; it is the fastest and shows every result instantly, so it suits manual traders. With master-child you trade in one master account, in our terminal or on your broker's terminal, and we copy it to the child accounts in the background; it suits an algo running in one account or traders who prefer the broker terminal.
Can I connect TradingView to my accounts?▾
Yes. You can connect your own TradingView alerts so they place orders in your accounts, on one account or many. An order is sent only when your alert fires, and you set up the rule yourself.
Can I run a TradingView, Amibroker or Python strategy across all my accounts?▾
Yes. You connect your own strategy from TradingView, Amibroker or our API, and when your strategy sends a signal, the order is placed across the accounts you choose. The signal comes from your own setup, which you configure and control, and you can stop it at any time.
Is there an API for programmers?▾
Yes. One broker-independent API works across every supported broker, with SDKs for Java, Python, C# and Excel.
Can I place many orders at once?▾
In the web app you place one order into one or more accounts at a time. To send many orders in one go, we provide a separate Excel tool that places them all at once into one or more accounts across brokers.
How much does it cost?▾
Between ₹295 and ₹495 per account per month, all taxes and static IP included. Every new account gets a free 1-month full-feature trial.
Do I get a static IP, and can I use my own?▾
Yes. Each account can get a dedicated static IP, included free in your price (subject to availability). Some brokers need a fixed IP to allow API access, and we take care of that for you. Many other tools charge extra for this or make you set up a proxy yourself, so a free static IP saves you up to ₹500 per broker trading account per month. If you would rather use your own IP, you can do that instead.
Can you add a feature I need?▾
Often, yes. We have a rapid development cycle, so when users ask for a new feature or a change, we can build and ship it quickly. Requests are subject to approval, but if it helps traders and fits the product, we move fast.
Try it free for one month
Connect your accounts and see your whole portfolio on one screen. No charge for the first month.
Sign up free