AmiBroker Multi-Account Button Trading
Click BUY and SELL buttons on an AmiBroker chart to place orders into one or many accounts at once.
You can click BUY and SELL buttons on an AmiBroker chart to send orders into one or many trading accounts at the same time. The accounts can be with the same broker or with different brokers. This works through AutoTrader Web and the AutoTrader Desktop client, which carry the order from AmiBroker to your broker.
This guide shows how to trade from AmiBroker buttons so that one click can place an order into one or more trading accounts across the same or different brokers. It works with leading Indian stock brokers.
We use the AutoTrader Web tool to place the orders.
Demos
Demo (Hindi)
Demo (English)
What you need
You need three tools for this setup. Click the links to learn more about each one.
- AmiBroker (registered or free trial version)
- AutoTrader Web (register and add your trading accounts)
- AutoTrader Desktop Client
Steps
We will go through each step in detail.
Step 1: Add accounts on AutoTrader Web
- Register on AutoTrader Web. See the user registration guide.
- Add all of your trading accounts, one by one, into AutoTrader Web. See adding trading accounts.
Step 2: Set up the at-desktop client
- This client lets AmiBroker talk to the AutoTrader Web server. The setup is explained in the desktop client guide.
- Install the AmiBroker library from the at-desktop Settings screen. This downloads the latest samples into your AmiBroker. You do this only once.
- After you install and set up the at-desktop client, start it. It must be in the MONITORING state.
Step 3: Bring up your AmiBroker chart
- Start AmiBroker.
- Start your AmiBroker live price datafeed.
- Bring up a fresh chart.
- Add your AFLs or indicators.
Step 4: Overlay the button AFL
- Open the Charts section in AmiBroker.
- Look for the folders (AutoTrader Web -> Buttons).
- Right click on the at-buy-sell-buttons AFL and click Overlay (see the screenshot below).
- You will now see BUY and SELL buttons on the top left of your chart.

Buy/Sell Button AFLs
Step 5: Set up chart parameters
Next, set up the chart parameters (see the screenshot below). The important parameters are:
| Group | Parameter | What it means |
|---|---|---|
| AutoTrader | Exchange | The exchange of the stock or derivative you want to trade. Search it on the instrument search tool. |
| AutoTrader | Symbol | The exchange of the stock or derivative you want to trade. Search it on the instrument search tool. |
| AutoTrader | Account | Ignore this parameter (it is not applicable). |
| AutoTrader | Product Type | The product type of your order (INTRADAY, DELIVERY, NORMAL). |
| AutoTrader | Quantity | The quantity to use for the order. |
| AutoTrader Buttons | Accounts | A comma separated list of your account numbers (one or many). |
| AutoTrader Buttons | Remaining parameters | These control the position and size of the BUY/SELL buttons. |
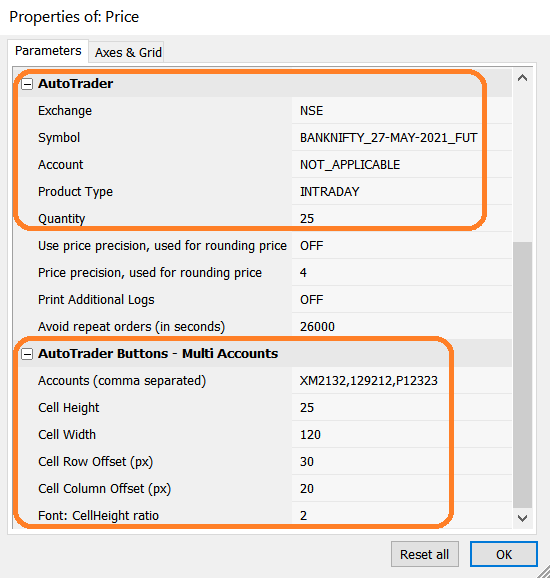
AmiBroker Button Parameters
Step 6: Trade (place orders)
You are now ready to trade. Do your analysis and click the BUY or SELL buttons when you see an opportunity.
Step 7: Debug (investigate)
When something does not work as expected, you need to investigate. These steps help you find the root cause of most problems.
- Enable AmiBroker logs and view them. See AmiBroker logs debugging.
- Check that the at-desktop client is in the Monitoring state.
- Check the at-desktop client logs (the Logs tab on the client).
- Check the server logs. See AutoTrader Web activity logs.
Customization
You can customize these AFLs to fit your needs. Always make a copy before you change anything. The sample files are replaced every time you reinstall our library.
Summary
You have now seen how to place orders into one or more trading accounts across different brokers from AmiBroker buttons. You can take this further, such as firing more than one order across different accounts, or placing bracket or cover orders. These samples are inside our library, so feel free to explore them.
For any queries, you can contact us.
Next steps
Thanks for the feedback. Still stuck? Contact support.
Last updated 1 July 2026