Trade
Place one order into many trading accounts at once, with full order controls.
The Trade screen places a single order into one or many trading accounts at the same time. You fill in the order details, pick the accounts, and the same order is copied across every selected account. It also covers symbol search, order types, a live market depth ladder, split orders, and per-account quantity control.
This screen lets you place an order into one or many accounts at once. Fill in the order details, pick the accounts, and the same order is copied across all selected accounts.
For more on order placement and copying options, see the PMS docs. To understand all features on this screen, we also recommend the PMS (Portfolio Management System) guide.
Demo video
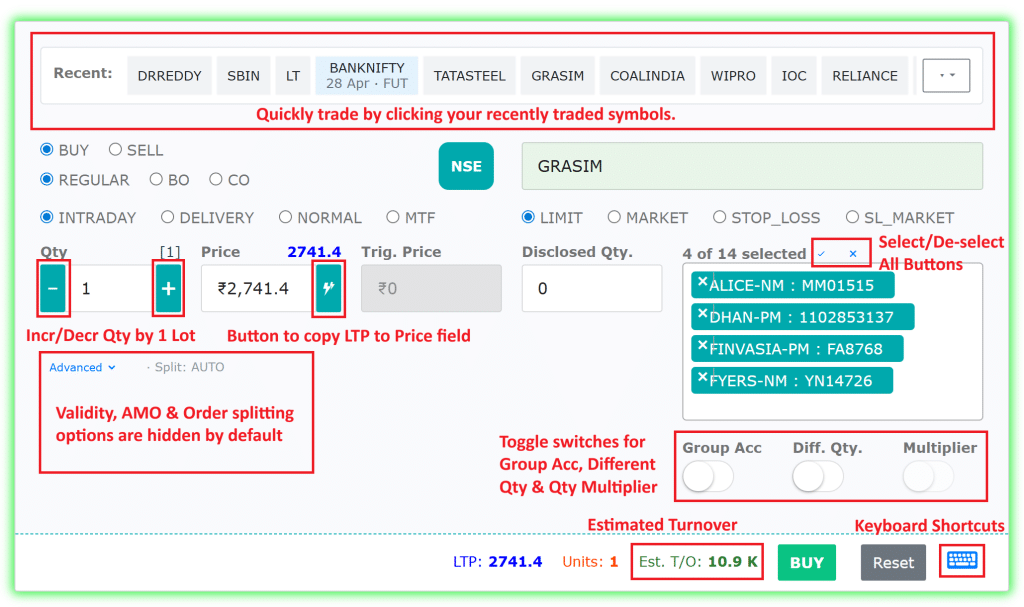
1. Recent Symbols
A row of colour-coded chips just above the order form shows your recently used symbols for one-click re-use.
| Colour | Instrument |
|---|---|
| Grey | Equity |
| Blue | Future |
| Green | Call (CE) |
| Red | Put (PE) |
Chips that don’t fit on one line are collapsed under the ▾ dropdown on the right. Click any chip to auto-fill the symbol and exchange.
Next to them, underlier chips show the index or stock names you trade options on most often. Click one to fill the underlier, then type the strike — for example, click BANKNIFTY, then type the strike — to build an option symbol quickly.
2. Symbol Search
The symbol field searches instruments intelligently:
- Works on the stock symbol, not the company name (for example,
SBINfor State Bank of India). - Supports hints like
future,call,put— for example,sbin,banknifty future,nifty call 23000. - Results are grouped by category (Stocks, Futures, Options, and so on) with a scrollbar for long lists.
- The exchange badge next to the symbol field updates automatically from the selected instrument, so you no longer need to pick the exchange manually.

3. Trade Direction and Variety
- BUY / SELL radio sets the order side. The big action button in the footer reflects your choice (green BUY / red SELL).
- REGULAR / BO / CO / GTT sets the order variety:
- REGULAR – a normal order.
- BO (Bracket Order) – reveals extra Target, Stoploss, and Trailing Stoploss inputs.
- CO (Cover Order) – an order with a built-in stop-loss.
- GTT (Good Till Triggered) – turns the form into a GTT order that rests until your trigger price is hit. See the section below.
GTT (Good Till Triggered)
When you choose GTT, the Quantity, Price and Trigger Price labels change to Target Qty, Target Limit and Target Trigger, and a GTT panel appears with:
- Trigger type – SINGLE (one trigger) or OCO (One-Cancels-Other: a target leg and a stop leg, where one triggering cancels the other).
- Valid Till – the date until which the GTT stays active (only for brokers that support it).
- Stop leg (OCO only) – extra Stop Trigger, Stop Limit and Stop Qty fields for the protective stop side.
GTT works only on brokers that offer a GTT feature, and is still in BETA for some brokers — please report any issue you notice. To manage your resting GTT orders, see the GTT orders page.
4. Product Type
Pick how the position is carried:
- INTRADAY – squared-off same day
- DELIVERY – equity delivery
- NORMAL – carry-forward for F&O
- MTF – Margin Trading Facility (new)
5. Order Type
Choose from LIMIT, MARKET, STOP_LOSS, or SL_MARKET. The Trigger Price field auto-shows or hides based on this selection.
6. Quantity, Price and Related Fields
- Quantity – use the – / + buttons to step by 1 or by lot size. The lot-size label (orange) appears when you pick a derivative.
- Price – the ⚡ Fill LTP button drops the live LTP into the price box and switches the order type to LIMIT. It activates once a live price feed arrives.
- Trigger Price – shown only for SL / SL-M orders.
- Disclosed Qty – optional disclosed quantity.
7. Market Depth Ladder
A live Market Depth panel on the right shows the top bids (green) and asks (red), with quantity bars scaled to size.
- Click any bid or ask price to copy it into the Price field. The order type switches to LIMIT automatically.
- The ladder updates live once a symbol is selected.
8. Advanced Options (collapsible)
Click Advanced ▾ to reveal:
- Validity – DAY or IOC.
- AMO – submit an After-Market Order.
- Split Order – break a large order into smaller child orders:
NO– don’t splitAUTO– split automatically using the exchange freeze-quantity limitQTY– split using the custom Slice Qty you specify
A summary of your advanced choices is shown inline, so you don’t have to expand the section just to check.
9. Accounts (Multi-Account Placement)
On the right you pick the target accounts:
- The multi-select box lists all accounts. Selecting more than one copies the order across them.
- Client quick-pick chips – above the selector, outlined pill chips for the accounts (clients) you place orders into most often. Click one to add it to the selection quickly.
- ✓ Select All and ✕ Clear mini-buttons above the selector speed up bulk picks.
- Group Acc toggle – treat a group as a single account.
- Diff Qty toggle – use a different quantity per account (the row-level quantity is editable in the table below).
- Multiplier toggle – apply the per-account multiplier to the quantity.
10. Per-Account Quantity / Margin Preview
Once accounts are selected, a small table lists each account with its Available Margin, Multiplier, and Quantity. When Diff-Qty is on, you can edit the per-account quantity directly here.
11. Cost Preview
A green Cost hint appears in the footer showing the approximate order value (Qty × Price / LTP). Hover to see a breakdown. This is especially useful with Diff-Qty turned on, where the tooltip lists per-account totals.
12. Keyboard Shortcuts
You can drive the Trade screen from the keyboard for faster order entry. Click the ⌨ keyboard icon in the footer to see the full list at any time. The main shortcuts are:
| Keys | Action |
|---|---|
| Ctrl + Enter | Submit the order |
| Alt + B / Alt + S | Switch to BUY / SELL |
| Alt + L / Alt + M | Switch to LIMIT / MARKET |
| Alt + R | Reset the form |
| ↑ / ↓ | Step the price or quantity up or down (hold Shift for a bigger step) |
| Esc | Leave the current field |
In the Modify, GTT, Square-off and Adjust Holdings windows, press Enter to submit and Esc to close.
There is also an optional Keyboard mode for the whole Portfolio, which lets you move through the Positions, Orders, Holdings and GTT tables with single keys and adds a command box (Ctrl + K) to jump to a screen, open a symbol, or prepare an order. For the full guide, see Keyboard Shortcuts.
13. Submit / Reset
- Reset – clears the form back to defaults.
- BUY / SELL – submits the order to all selected accounts. The spinner next to it indicates in-flight submission, and the response panel below the form shows per-account results.
Timing of your orders
After you place the orders, the result panel shows a Timing section. By default it shows the total time and the number of orders. Expand it to see a small bar chart with one bar per order, sorted slowest first, so you can quickly spot which order took the longest.
Each bar shows the account name, the broker order id, and how long that broker took to respond to the order. The slowest order is highlighted, so it is easy to tell whether a delay was at one broker’s end. When one large order is split into several, each part is shown as its own bar.
Why one broker can be a little slower. Part of each time is the plain network travel to and from your broker, which we cannot speed up. Some brokers allow API access only from a fixed IP on the older IPv4 network, and providing a fixed IP on that network needs some extra network routing that can add a small delay to each order. Brokers that support the newer IPv6 network do not need this, so for them the delay is negligible.
Which order types and varieties does my broker support?
Order varieties (BO, CO), product types (like MTF) and order types (such as SL-M) are shown on this screen, but each one works only if your broker offers it on their own platform. Availability changes from broker to broker.
The easiest way to find out is to test it:
- Place a small sample order with the option you want to use.
- If it goes through, your broker supports it.
- If you get an error, or the option is not available for that account, your broker may not support it.
If an order type you need is not available for your broker, please contact support or suggest it as a feature request, and we will look into it.
Frequently asked questions
Which order types and varieties can I use?▾
It depends on your broker. Order varieties (BO, CO), product types (like MTF) and order types (such as SL-M) work only if your broker offers them on their own platform. The easiest way to check is to try it: place a small sample order with that option and see if it goes through. If you get an error or do not see the option, your broker may not support it — suggest it as a feature request on our Built with traders page and we will look into it.
How can I check how fast my orders were placed across accounts?▾
After placing an order from the Trade screen, open the Timing section in the result window. It shows how long each broker took to respond, as a bar chart with the slowest order highlighted, so you can see at a glance whether a delay was at one broker's end. When one large order is split into several, each part is shown separately.
Can I place orders using the keyboard?▾
Yes. The Trade screen has keyboard shortcuts for the common actions — for example Ctrl+Enter to submit, Alt+B or Alt+S to switch between Buy and Sell, and the arrow keys to step the price or quantity. There is also an optional Keyboard mode you turn on from the portfolio screen: it lets you move through table rows and act on them with single keys, and it adds a command box (Ctrl+K) to jump to a symbol, prepare an order, or switch screens. Anything you set up this way is always shown for you to review and send — it is never sent for you.
How do I prepare an options order from the keyboard command box?▾
Turn on Keyboard mode on the portfolio screen, press Ctrl+K to open the command box, then type the symbol, then B or S, then the quantity. For example, NIFTY 25000 CALL B 10 prepares a Buy of 10 lots of the NIFTY 25000 call. For options and futures the quantity is counted in lots, and the strike price stays part of the symbol, so it is never read as the quantity. You can write the option side as call or put, or as ce or pe — both work. The order is only prepared on the Trade screen for you to review and send; it is never sent automatically. If you need an exact number of units instead of lots, add u to the quantity, like RELIANCE S 100u.
Next steps
Thanks for the feedback. Still stuck? Contact support.
Last updated 15 July 2026