Dhan
Add and validate your Dhan account in AutoTrader Web.
To add a Dhan account in AutoTrader Web, pick one of two platforms. DHAN_V2_AT_IPV6 needs a one-time setup and then connects every day on its own. DHAN_V2_IPV6 is a manual backup where you generate the access token yourself each day. Both use Dhan's free trading APIs and need a static IP registered with Dhan.
AutoTrader Web uses the Dhan trading APIs, which are completely free.
Which platform should I use?
Dhan offers two ways to connect through its API. Each one is a separate platform in our system.
| Platform | How it connects | When to use it |
|---|---|---|
DHAN_V2_AT_IPV6 | One-time setup, then connects every day on its own | Recommended for most users |
DHAN_V2_IPV6 | You generate the access token each day and copy it into our system | Backup when the automatic connection fails |
A few notes:
DHAN_V2_AT_IPV6is the recommended platform. It sometimes fails to connect because Dhan’s APIs are not always reliable (see Common Issues). We have reported these issues to Dhan many times, but they remain.- If you see login errors, switch to the
DHAN_V2_IPV6platform for the time being. DHAN_V2_IPV6is also designed to auto-generate tokens. Each morning you can click the Validate All button to check if your token was regenerated. Generate the token manually only if you see a failure.
Demo
Platform 1: DHAN_V2_AT_IPV6
Step 1 – Generate API Key
- Log in to the Dhan trading website.
- Open the menu on the top right by clicking your profile picture.
- Click Dhan HQ Trading APIs.
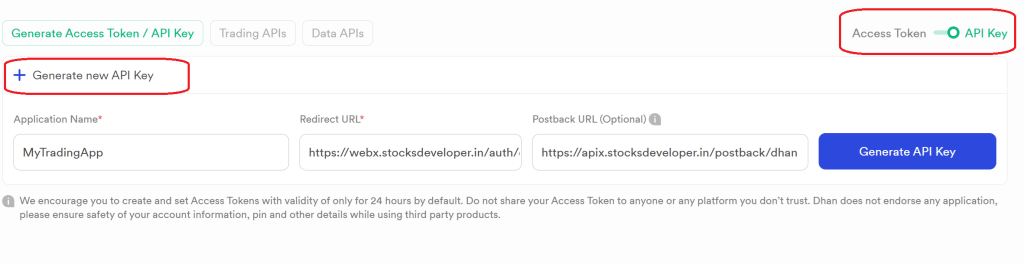
- By default it shows “Access Token”. Switch to “API key” using the toggle button.
- Fill in the API details:
- Application Name: MyTradingApp
- Redirect Url:
https://webx.stocksdeveloper.in/auth/dhan - Postback Url:
https://apix.stocksdeveloper.in/postback/dhan - Click Generate API Key (see screenshots below)
- Set up the static IP:
- The API screen has an option to set up static IPs.
- See Step 3 below to learn how to get your primary and secondary static IP.
- Register both the primary and secondary static IP with Dhan.
Step 2 – Setup TOTP
The same API page has an option to set up TOTP.
- Enable TOTP.
- Scan the QR code in your authenticator app, such as Google Authenticator.
- Copy the TOTP Key (a long string of 15 to 30 random characters). This step is important.
- Save the TOTP Key, as you will need it in the next step.
- Click the Enable TOTP button.
Step 3 – Add your Dhan account
- Go to the AutoTrader Web menu (Accounts -> Trading Accounts).
- Click the Create button.
- Select Broker as Dhan.
- Select Platform as DHAN_V2_AT_IPV6, then enter:
- Dhan Client ID
- Click the Auto Assign IP button to get your static IP
- MPIN
- TOTP Key
- 10 digit Phone number registered with your Dhan account
- API Key (shown on the Dhan API screen)
- API Secret (shown on the Dhan API screen)
- A nickname
- Click Validate and Save.
- That’s it. You have successfully added your Dhan account. Do not forget to read these known limitations.
Screenshots
Platform 2: DHAN_V2_IPV6
Step 1 – Generate Access Token
- Log in to the Dhan trading website.
- Open the menu on the top right by clicking your profile picture.
- Click Dhan HQ Trading APIs.
- By default it shows “Access Token”.
- Fill in the API details:
- Application Name: MyTradingApp
- Postback Url:
https://apix.stocksdeveloper.in/postback/dhan - Click Generate Access Token
- Set up the static IP:
- The API screen has an option to set up static IPs.
- See Step 2 below to learn how to get your primary and secondary static IP.
- Register both the primary and secondary static IP with Dhan.
Step 2 – Add your Dhan account
- Go to the AutoTrader Web menu (Accounts -> Trading Accounts).
- Select Broker as Dhan.
- Click the Create button.
- Select Platform as DHAN_V2_IPV6, then enter:
- Dhan Client ID
- Enter Access Token
- Note: the access token expires every day. Remember to regenerate it every morning and update it.
- A nickname
- Click Validate and Save.
- Set up the static IP:
- Click the small EDIT icon next to your account’s client id or login id to edit it.
- Click the Auto Assign IP button to get your static IP.
- Register both the primary and secondary static IP with Dhan.
- That’s it. You have successfully added your Dhan account. Do not forget to read these known limitations.
Common Issues
These are some common errors seen on the Dhan broker. Most of them are bugs on Dhan’s side, and we have already reported them to Dhan. These errors do not happen all the time. They come and go, so they are hard to get fixed.
- Login failed: Error from Dhan: [DH-906 – Invalid Token]
- Login failed: Please regenerate the API token on Dhan & update in our system
- Login failed: Error from Dhan: TOTP Validation Failed: [RS-0060] Too many requests, please try again after some time
- Login failed: Error from Dhan: Dhan Consent API Failed: [CONSENT_LIMIT_EXCEED] Consent limit Exceeded
- TOTP Rejected by Server (isValid: false). Check Time/Clock Sync
Solution
If you see any of these errors, switch to the Dhan DHAN_V2_IPV6 platform. That platform requires you to manually generate the access token every day and update it in our system.
This is explained at the start of the demo video above.
Frequently asked questions
Does AutoTrader Web support Dhan?▾
Yes. Dhan is fully supported. You can connect one or many Dhan accounts and monitor live P&L, holdings and positions, place and manage orders, and copy trade across all of them from one screen, on web or mobile.
Can I copy trade with Dhan?▾
Yes. You can copy trade with Dhan in two ways — PMS copy from our terminal and master-child copy in the background — across accounts and brokers, with per-account sizing. You set up and control everything.
Can I manage multiple Dhan accounts together?▾
Yes. Add as many Dhan accounts as you like and see consolidated P&L, holdings and positions live, and trade across all of them at once.
How much does it cost to use Dhan with AutoTrader Web?▾
AutoTrader Web is ₹295 to ₹495 per account per month, with all taxes included, and a free 1-month trial. If the account needs a static IP, it is ₹100 per month for one IPv6 static IP — you get a primary and a backup address, and the backup is included free (taxes included) — or bring your own IP for free. If Dhan charges separately for API access, that fee is set by the broker.
Next steps
Thanks for the feedback. Still stuck? Contact support.
Last updated 17 July 2026