Trading Accounts
Add, validate, edit or delete the broker accounts you want to trade with.
The Trading Accounts screen is where you add, validate, edit or delete the broker accounts you want to trade with. Each account can belong to any supported broker. Always validate an account before saving it to confirm the credentials are correct. To change an account's details — including its platform — edit the account; you never need to delete and re-create it. Only a change of login id or broker needs a delete and re-create. Credentials are stored encrypted, so even our support staff cannot read them.
This is where you manage your trading accounts. Our API functions accept a pseudo account, which in turn points to an actual trading account. That account can belong to any of the stock brokers we support.
Demo video
Manage accounts
On the Trading Accounts screen you can:
- Validate all accounts — click the “Validate All” button to check the login credentials of every account. When the check finishes, a short result is shown next to the buttons, so you always know it ran.
- Create an account — click the “Create” button to add a new account.
- Edit or delete an account — click on the account’s “Login Id”. Editing lets you change everything except the login id and the broker (see below).
- Rename a nickname — click the pencil icon in the “Nickname” column (see below).
- Mark live or non-live — select one or more accounts and click “Live” or “Non-live”.
- Validate before saving — validate the account first. This confirms you have entered the correct credentials for your trading account.
Help while adding an account
Every broker’s setup is a little different, so the add-account screen now guides you through it:
- Setup guide card — for popular brokers, a small Setup guide appears once you pick your platform. It lists that broker’s steps in order — for example: create your API app, fill in your details, validate — and ticks each step off as you complete it. Each open step links to that broker’s own setup guide. Not every broker has a guide card yet; more are being added.
- Smarter Support chat — while you are on this screen, the Support chat knows which broker and platform you picked, which boxes are still empty, and which setup step you are on. Ask things like “what do I do next?” or “why did validation fail?” and it answers for your exact situation. Your privacy stays protected: the assistant can see which boxes are filled or empty, but it can never read what you typed into them — your password, TOTP key and API details never reach the chat.
- Ask Support on errors — if validation fails, the error popup has an Ask Support button. Click it and the chat opens with your error already filled in, so you get help for that exact problem.
Add an account before you have your API key
For most brokers you can get your static IP right on the add-account screen before you even save it, so there is nothing to work around. The exception is a Premium static IPv4 (for example on Angel One and InCred), which has to belong to a saved account. If your broker will not create your API app — and so will not give you an API key — until that static IP is whitelisted, you can save the account without its API details first:
- On the add-account screen, choose your broker and platform, then fill in the other account details the form asks for.
- Tick “I don’t have my API key yet”.
- Check your login ID carefully before you save: you cannot change it later. Then click Save. The account is saved and kept switched off.
- Open the account, click Static IP and get the IP (see Static IP setup).
- Whitelist that IP with your broker and create your API app.
- Open the account again, enter your API details and click Save.
- Select the account and click Live to switch it on.
A switched-off account cannot trade, so nothing happens until you finish step 7. You will only see this tick box for a broker whose static IP has to be bought against a saved account. For every other broker, click Static IP on the add-account screen itself and add your API details in the same save.
Edit an account — no need to delete
To change an account’s details, edit the account. You do not need to delete and re-create it. People most often edit an account to:
- Update an expired password — reset the password with your broker first, then save the new password here (see Trading platform password expired).
- Change broker login or API credentials — a new password, TOTP key, API key or API secret.
- Change or view the static IP — use the Static IP button to see the IP assigned to the account, take one from us, or bring your own IP (see Static IP setup).
- Change the platform — move the account to a different platform of the same broker.
Steps:
- Go to Accounts -> Trading Accounts.
- Click the pencil icon next to the account’s Login Id.
- Change what you need.
- Click Validate, then Save.
When you pick a new platform, the form shows the fields that platform needs — fill them in before you validate. If the new platform needs a static IP, assign it after saving. Your nickname, groups and other settings stay as they are.
Only two things cannot be changed by editing:
- the login id
- the broker
For these two, delete the account and create it again.
Rename a nickname
Each account has a nickname — the easy name your strategy code uses. You can rename it right here: in the Nickname column, click the pencil icon, type the new name and confirm.
Important: The nickname is the name your API, algo or Excel code uses to place orders. If you rename it, you must change your code to the new name as well. If you do not, your orders will fail.
Account status and “Validate All”
Each trading account shows a Session status. This tells you whether the account is ready to trade. There are four values:
| Status | What it means |
|---|---|
| Logged In | The account is in use and its session is active. It is ready to trade. |
| Logged Out | There is no active session right now. This is not an error. It is normal at the start of a trading day, or after you change an account (for example its live / non-live status or its credentials). You usually do not need to do anything — for almost every account the session starts on its own as soon as you begin using it (for example when you open Trading -> Portfolio), and the status changes to Logged In. Only a few broker platforms need a manual login — see the note below. |
| Error | The last login attempt to the broker failed. Click Validate All to see the exact message the broker returned (for example a wrong API key, an expired password, or a TOTP problem), then fix it. |
| Missing | The account is not in use in the system yet, so no session has been created for it. |
Brokers that need a manual login
For most accounts the connection happens on its own the first time you use the account, so you never have to press anything. Only a few broker platforms require you to log in yourself on the broker’s page. For these, a Login button appears in the Login column. Click it, finish the login on the broker’s page, and the session becomes active. The Login column stays blank for brokers that do not need this.
Check your accounts before you trade
It is good practice to click Validate All every day before you start trading. The system then checks the login of all your LIVE accounts:
- If the login works, the status changes to Logged In.
- If something is wrong, the system shows the error message for that account. Please read it and take the corrective action.
Doing this early gives you time to fix any problem — such as an expired broker password — before the market opens. If you are not sure what an error means or how to fix it, ask our support chatbot for help.
How you know the check has run
While the check is running, the Validate All button says Validating…. When it finishes, a short result appears next to the buttons and stays there, for example:
Checked at 9:05:12 AM: all 4 live account(s) are working.
If something needs your attention it says so instead — for example 2 of 4 live account(s) need attention — and you read the Message column for the reason. A message also pops up in the corner of the screen with the same result.
This matters most when everything is fine. All your accounts may already be logged in, so the check finishes almost instantly and the table barely changes. The result line tells you the check really ran, so you do not have to click the button again to be sure.
Accounts that are not live are not checked at all, and they are never counted as a problem. The result line only counts your live accounts.
Recharge an account
Select one or more accounts and click Recharge to renew their licence. The amount is taken from your wallet, and the time you buy is added on top of the account’s current expiry date — so you never lose the days you already have.
Recharge for 1 to 6 months
When you select one account, you can choose 1 to 6 months. One month is already picked for you, so a normal recharge works just as before.
Before you confirm, the screen shows what your choice will cost:
- the licence amount for the months you picked,
- the static IP amount, if that account uses one,
- the date the account will then be valid till,
- your wallet balance, and a warning if it is not enough.
Every month is not always the same price. Your rate steps down as your lifetime bill crosses a threshold, so a longer recharge can cross that point part-way and cost a little less. Always read the amount on screen.
A longer recharge also renews that account’s static IP for the same period, so the licence and the IP stay on the same date.
If your wallet cannot cover the full amount, nothing is recharged — not one month of it. Add money or pick fewer months, then try again.
Select more than one account and each one is recharged for one month. To buy several months, select a single account.
Recharging several accounts at once
The screen adds up the whole bill before anything is charged:
- the total for all the selected accounts,
- how much of it is licence and how much is static IP,
- your wallet balance.
Click See the cost of each account to open a small table with each account’s licence, static IP, total and the date each one pays until. With a single account the same breakdown is under How this is worked out.
Nothing is charged unless your wallet covers every licence and every static IP. If it falls short, the screen says how much to add (for example add at least ₹25.19) and the Recharge button is not shown. Add money or select fewer accounts. You can never end up with a recharged licence whose static IP was left unpaid.
Static IP expired but the licence is valid
The IP Days column shows a red 0 when an account’s static IP is unpaid. Orders on that account are paused, even though the licence is still valid. Click Pay IP next to the 0: it shows the price and renews only the static IP, up to the account’s licence date. You do not need to recharge the account for this.
If you select such an account and click Recharge, the screen points this out and offers Pay for the IP only instead of a licence month you do not need.
If the licence has expired too, there is no Pay IP link: recharge the account, which renews the licence and its static IP together. See Trading blocked: your static IP has expired.
Premium static IPv4: an account using a Premium static IPv4 can only be recharged one month at a time. That IP renews on its own every month, so a longer licence would leave the two on different dates.
”Recharge is not needed yet”
If an account you selected still has more than 15 days of validity left, we show a warning before charging anything. It lists each such account with the days left and the date it is valid till, and asks you to confirm.
This is only a warning, not an error — you can still click Recharge anyway. It is there because recharging an account that does not need it is usually a mistake, for example when you have already recharged it this month and forgotten. See Recharge is not needed yet.
To stop watching expiry dates altogether, turn on Auto Recharge in Settings -> General. Your live accounts are then recharged from your wallet when they expire.
Columns
Each row is one trading account. A few columns stay hidden until you click Validate All or change an account’s live status.
| Column | Meaning |
|---|---|
| Login Id | Your broker client (login) id. Click the pencil icon next to it to edit the account. |
| Owner | The owner’s email, if you have assigned one (see Owners). Hidden when no account has an owner. |
| Nickname | The nickname (pseudo account) you gave the account. Click the pencil icon next to it to rename the nickname. |
| Live | YES or NO — whether the account is active for trading. |
| Login | A Login button appears here for brokers that use OAuth login. Click it to open the broker’s login page in a new tab and create a fresh session. It is blank for brokers that do not use OAuth. |
| Session | The login session status — Logged In, Logged Out, Error or Missing (see Account status). |
| Expiry | The account’s licence expiry date. |
| Days | Days left until expiry. |
| IP Days | Days left on the account’s static IP from us. A red 0 means the IP is unpaid and orders on the account are paused; click Pay IP next to it to renew just the IP. Blank when the account uses its own IP, has no static IP from us, or its IP has not had its first charge yet. |
| Paid | Whether the account is Paid or on a free Trial. |
| Broker | The broker for this account. |
| Platform | The broker platform the account connects through. |
| Id | Internal account id (useful when you contact support). |
| Message | The validation result message. On a failed account it also shows a “Get help with this” icon that opens the support chatbot with the error filled in. Hidden until you validate. |
| Valid | The validation result (SUCCESS or FAILURE). Hidden until you validate. |
Buttons
| Button | What it does |
|---|---|
| Create | Add a new trading account. |
| Validate All | Check the login of every live account and fill the Session, Message and Valid columns. Shows the result next to the buttons when it finishes. |
| Live / Non-live | Mark the selected accounts as active or inactive. |
| Delete | Delete the selected accounts. |
| Recharge | Recharge the selected accounts for another month — or for up to 6 months when you select a single account. Warns you first if an account still has more than 15 days left. |
| Reset | Clear all table filters. |
| Select / Deselect | Select or clear all the (filtered) rows. |
Security
Credentials are stored in encrypted form in our database, so even our support staff cannot read them. To learn more, see Security.
Screen
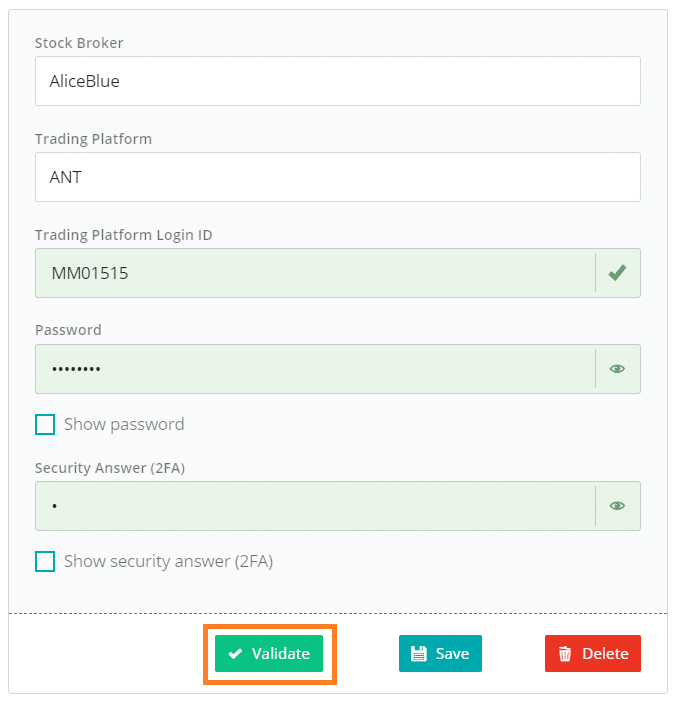
Create Trading Account
Frequently asked questions
I am stuck while adding my broker account. Where can I get help?▾
For popular brokers, a Setup guide card on the add-account screen lists each step and ticks them off as you go. If you are still stuck, open the Support chat on the same screen — it knows which broker and platform you picked, which boxes are still empty and which step you are on, so it can tell you exactly what to do next. It can never read what you typed into the boxes — only whether they are filled — so your password and API details stay private. If validation fails, click the Ask Support button on the error popup to get help for that exact error.
How many trading accounts can I add?▾
There is no limit on the total number of accounts you can use. The only limit is on the free trial: you can keep up to 3 accounts on free trial at the same time. Accounts that have a static IP from us do not use a trial slot, so they are not counted. There is no separate paid plan to switch to. To free up a slot you can either recharge one of your free-trial accounts, which turns it into a paid account, or take a static IP from us for one of them. An IP you bring yourself is free, so it does not free up a slot. Repeat this to add as many accounts as you need. Each account is billed on its own, and you can recharge it for 1 to 6 months at a time.
Do I need to delete and re-create my account to change something, like its platform?▾
No. Edit the account instead — on the Trading Accounts screen, click the pencil icon next to the account's Login Id, change what you need, then click Validate and Save. People most often edit an account to: update an expired trading account password, change their stock broker login or API credentials (password, TOTP key, API key, API secret), change or view the static IP, or change the platform. Your nickname and other settings stay as they are. Only two things cannot be changed by editing: the login id and the broker. For those two, delete the account and create it again.
Can I recharge an account for more than one month?▾
Yes. Select a single account on the Accounts -> Trading Accounts screen and click Recharge, then pick 1 to 6 months. One month is picked for you by default. Before you confirm, the screen shows the full amount — the licence for the months you chose, the static IP amount if that account uses one, the date it will be valid till, and your wallet balance. A longer recharge renews that account's static IP for the same period too, so both stay on the same date. If your wallet cannot cover the whole amount, nothing is recharged, so add money or pick fewer months. To buy several months you must select one account at a time; selecting several accounts recharges each for one month. With several accounts selected, the screen shows the total for all of them, split into licence and static IP, and nothing is charged unless your wallet covers every licence and every static IP. An account on a Premium static IPv4 can only be recharged one month at a time, because that IP renews on its own every month.
Can I rename a nickname?▾
Yes. On the Trading Accounts screen, click the pencil icon in the Nickname column, type the new name and confirm. The nickname is the name your API, algo or Excel code uses to place orders, so after renaming you must update your code to the new name or your orders will fail.
How do I check that all my broker accounts are connected and logged in?▾
Open Accounts -> Trading Accounts and click the Validate All button. It logs in all your live accounts and fills the Session column, so you can see every account at a glance. When the check finishes, a short result is shown next to the buttons — for example 'Checked at 9:05:12 AM: all 4 live account(s) are working' — so you always know it ran, even when everything was already fine and nothing on the table changed. Logged In means the account is connected and ready to trade. Logged Out is not an error — it only means there is no active session yet, and for almost every account it connects on its own the moment you start using it (for example when you open Trading -> Portfolio). Only Error means a login actually failed; click Validate All and read the Message column for the exact reason, then fix it. It is good practice to run Validate All every day before the market opens.
What do the account session statuses (Logged In, Logged Out, Error, Missing) mean?▾
Logged In means the account is in use and its session is active, so it is ready to trade. Logged Out means there is no active session right now — this is not an error and is normal at the start of a trading day or after you change an account; you usually do not need to do anything, because for almost every account the session starts on its own as soon as you begin using it (for example when you open Trading -> Portfolio), and only a few broker platforms need a manual login (a Login button appears for those). Error means the last login to the broker failed — click Validate All to see the exact message the broker returned, then fix it. Missing means the account is not in use in the system yet, so no session has been created for it.
My account shows 'Logged Out'. Is something wrong?▾
No, Logged Out is not an error. It simply means there is no active session at the moment, which is normal at the start of a trading day, after you change an account's live status or credentials, or after your account was unblocked. You usually do not need to do anything — for almost every account the session starts on its own as soon as you begin using it, for example when you open Trading -> Portfolio, and the status changes to Logged In. If you want to log it back in right away, make sure the account is Live and click the Validate All button — this logs in all your live accounts. Only a few broker platforms need a manual login — for those a Login button appears in the Login column; click it and finish the login on the broker's page. You do not need to edit the account and Save again — that is only for adding a new account or changing its details.
Should I do anything before I start trading each day?▾
Yes. It is good practice to click Validate All every day before you start trading. The system checks the login of all your live accounts and shows any problems, such as an expired broker password. Doing this early gives you time to fix any issue before the market opens. On success the account status shows as Logged In.
My broker rejected my TOTP. What should I do?▾
A rejected TOTP almost always means the TOTP Key saved on your account is wrong. First, make sure you entered the TOTP Key — the longer secret string your broker shows when you set up TOTP — and not the 6-digit code from your authenticator app; the two are not the same. Also make sure you finished TOTP setup on the broker: many users copy the key into our system but close the broker's setup screen without completing the activation, so TOTP is never switched on. Some brokers show the TOTP Key only once during setup and hide it afterwards. If you no longer have it, disable TOTP on your broker and enable it again to get a fresh key, then copy that key into the account here and click Validate & Save.
Next steps
Thanks for the feedback. Still stuck? Contact support.
Last updated 8 October 2026